Sunday, July 29, 2012

The Process

The title of the post is supposed to refer to the process of my mosaic project. Unfortunately, for me, it has also been a process of trying to figure out upgrades to my computer. You see, last night, my husband, on his own, decided to upgrade my operating software to Cloud. Then he decided to upgrade my iPhoto. He is now playing golf and I am now struggling with how to figure out all the changes that have been made to my computer. I hardly knew what I was doing before. I feel frustrated more than words can say. I am sure, at some point, I will get the hang of it, but right this minute... well... let's just get on to what this post was intended to be about!

I thought you might like to see the beginning part of the process for my mosaic project.
I first set different pieces of china out, on the table, I am going to mosaic.
I looked at it for some time and sort of got a plan in my head.

Next, I started cutting up the china I decided to use. When You have a piece, such as a dinner plate, one must first decide if one is going to use 
the focal ( the center of the plate )
or the rim. It cannot be had both ways.
If you want the focal and the rim then you need to have 2 pieces of china that are alike. If you want to use the focal, you slowly cut around the edge of the plate, until you have the center piece.
If you want the rim pieces the process is entirely different.
You start on the edge in the center of the plate, at the rim . You have the mosaic cutting tool on the rim facing the opposite rim and you cut. This should cut the plate in half. Next you do the same procedure cutting the plate in fourths, and so on. Then you trim the rim pieces until you have the edge you want. I will take pictures of this process later and post them for you to see.
The above pictures placed together are a product of this new  updated iPhoto and me not knowing how to use it. I would redo them but it would take way too much time and I would feel frustrated all over again.
The above pictures are of the cutting tool and the box over which I have cut and cut and cut the china.
The second picture is a prototype of my design. 
The more I looked at it, the more I just didn't like it.
It seemed too busy. So, I decided to do something different.

See the glove below...after cutting china for hours
my right hand got a big blister and was sore, sore, sore.
Why didn't I think of this before?
I got a glove and put it on my hand. It helped immensely!
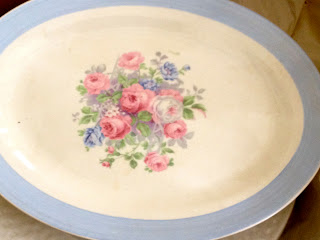
This is my new design. I decided I needed to put a border around the outside of the table to match the border around the center plate I used. Before I had set the table with a salad plate above each dinner plate and rimmed all the plates. It looked too busy. Now I have dinner plates rimmed around the table and one focal dinner plate in the center. My friend, Kim, gave me the center focal. 
Wait till you see her storage space....
This will be a later post!

Another shot at the full design
and below
a shot of the center focal.
I just love it. The rim is from a different set
of dishes. Remember, I told you if you only had one
plate of a particular kind you have to choose the focal 
or the rim. In this case, the rim was pretty but certainly
not as pretty as the focal in the center of the plate.
I had purchased a set of the china that I cut the rim from. I just love it... Wide, beautiful embossed rim. I cut up all the dinner plates but one to get enough to go around the outside of the table, to match the center.
So, now I think I will go glue down these pieces. I will be using silicone to glue since, like the mailbox, it will be used outside.
Hope you have an unfrustrating Sunday!
:)

Friday, July 27, 2012

Cottage This and Thats

 This is a picture of my new shelves 
my husband put in so I could use
my vintage shelves to hold mosaic dishes.
He did a wonderful job!
And this is a picture of some of
the squirrels work while I was away.
Three torn up cushions. This is the
 second time cushion covers have been
ruined. Yesterday I remade two of them.
I did not discover the third one until 
on the deck last night for Happy Hour.
I was not happy when I found the third
cushion. They have also been attacking
the Willow furniture. AAhhh... I used to 
love them...it is fast becoming a 
Love/Hate Relationship.
 Before shot of the ceiling in the
upstairs guest room.
The after shot....
Isn't it adorable? I found it at Ikea
thanks to my sweet friend, Kim.
She had purchased one for her new abode.
I think I might be going back to Ikea when
I am in the valley to buy another one for
a bedroom in the valley. I just love it.
It can be used as a shade, also. I purchased 
hardware that turned it into a swag. My
honey figured out how to turn it into a wall mount. :)
 Halloween in July
I have been working on packaging for
one of my Ortho girls...These are 
Halloween necklaces. They are packaged in
clear bags. I still have to ribbon them up!
Another part of an Ortho product..
These are sticker tags for a kit that
contains everything to make Oreo Pops.
I have covered up the name of the Ortho
with a vintage button card,just to protect the identity of the orthodontist for which these are being made. I sewed some vintage 
buttons on things yesterday so the card was conveniently on the table.
My dishes came!!!
I love them, I love them, I love them...
Yesterday I started playing around with
arranging dishes on the table to be mosaiced. I think I have come up with a plan. I am
now cutting.
 This is one of the sweetest
medicine cabinets I have ever
seen. The picture does not do it
justice. There is some etching on the glass
at the top of the glass. My plan is to 
mosaic the very top rounded oval. I am thinking about doing the bottom as well. I will have to see how it looks with just the top done. The paper you see inside will be removed.
This is the couch I could not resist.
I kept going back and looking at it.
It was priced at $350. I asked the mall
to call the owner and get the best price.
$225......SOLD...
I have no idea where I am using it. I am picturing it painted and distressed in Old White chalk paint and covered in drop cloth material. When this will get done is questionable but I do not have buyer's remorse.
 These tables, however, I am still
dreaming about. See the insert that looks
like some kind of fake marble. Well, it
just lifts out. It would be very easy to
have a piece of plywood cut to fit the space
and then mosaic the insets..... Again...
they would be painted with chalk paint.
The end tables were only $45. and the coffee table was $55. Again... I don't have anywhere to use them really but they are calling out to me. I might have to go back and get them if they are still there the next time I am in the valley.

Guess I best get busy cutting china. Hope whatever your day holds it brings you joy!

Monday, July 23, 2012

How's A Girl To Choose?


My First Shelf of Dishes

I also got a new app for my IPhone called snapseed. It is a photo editing program for the phone. As you will see in these pictures I had some fun playing around with it this afternoon.

My Second Shelf of Dishes
These dishes I had in the valley. They were not a complete set so I decided to use them for mosaic.

This is another set that I already had. I bought these on one of my cross country trips. See the gold rim....I put one of the dishes in the microwave...need I say more? Poof... 
Turned into mosaic dishes....

Now we get to the recent purchases.
I bought these dishes from Merchant Square, located in Chandler, AZ. I got a great deal on them and what is a girl to do when there is a great deal on dishes?????
Buy Them!!!


This set is one I showed you in a previous post. It is very much like the other set I bought. I paid a lot more money for these though.
I bought this set for the rim of the dishes. I might try to sell the focals on Etsy. I also bought this set at Merchant Square last week.


I got several plates and salad plates of this pattern. They were marked half price and the beginning price was just $2.00 per plate! Yippee....
Another set bought at Merchant Square last week.

Just look at the beautiful embossing on the edge of this plate. I got this set for the rim also. Another Merchant Square find. When I went to check out I got a surprise. This dealer was having a 25% off sale..... another yippee!
It certainly is a good thing that my husband built us shelves in the laundry room while I was in the valley. It freed up my vintage shelf pieces to hold all of my dishes for mosaic...
AND
I bought another beautiful set on eBay... I better get to cutting some time soon. I will share a picture of those when they arrive.
It seems I have dish fever!

Thursday, July 12, 2012

Before Pictures of Our Dream Beach Cottage


This should be interesting.
Smile
My friend, Dianne, and her husband, Chris,
 from Nashville,
used our condo, in Destin, FL
over the Fourth of July week.
She kindly asked me if she could
post some pictures!
Well,
Hello, 
Yes,
Of
Course!
Thank You Very Much!

I have not posted before and after pictures yet.
I plan to take some more After pictures when we
go there in October.
For now, though, I thought it might be fun, 
for you, to look at some of my before pictures and
then jump over to Dianne's blog, here, ( I give you the link again at the end of this post, in case you want to wait until you have viewed all the before pictures I am sharing) and see
the after pictures she took.
I tried to coordinate some before pictures, 
in order,
but I am sure it did not turn out very cohesive.
You will be able to see the magnitude of this project though!
I was so happy to hear Dianne's appreciation of all
our hard work to make this our dream beach cottage.
I hope you will enjoy seeing it and visiting my friend!


 First up is the entryway...
See the brown screen door..
It now has a Victorian White Screen door in it's place.
I will take a picture in October and post again.
The flooring throughout the condo is Bamboo,
except for the bathrooms and it is a tile. I used this same tile as the back splash in the kitchen.You will see pictures of the flooring when visiting Dianne.
You will be seeing Bead Board with Board and Batten on top of the Bead Board, in the entry way.
 This is the Great Room..
It looks small from this angle but it is actually
a very nice size. The wall
you are looking straight ahead at is the wall
the television is on above the console featured on Dianne's blog. The wall to the right is the wall the very large vintage window from PN is hanging over a couch. I purchased the piece in Nashville when visiting my dear friend Suzanne. I think I posted the remake of all the furniture before but I will give more info or repeat myself ( which I do quite frequently these days!) in October. We had the beams white washed. We added bead board inbetween the beams and painted it Sherwin Williams Rainwashed. 
 In one of the first pictures on Dianne's blog you will notice
what looks like a cabinet door. The electrical box was originally in the closet below. We had it turned around to 
face the foyer. I had it framed out and ordered a cabinet door to match the cabinets in the kitchen to disquise the box. We did this so we could move the heating and cooling system over above the water heater. We needed more room on the right hand side as we were about to open the kitchen up to the great room.
On Dianne's blog you will see a picture of a big opening with corbels on each side. That is the opening of which I speak.

 This is a picture of a soffet that came down between the dining area and the kitchen. We removed it, as we added a couple of feet onto the kitchen.
 Here you are looking at the original kitchen from the dining area. See those cabinets... they are all gone... and some of them were not replaced. Let me see if I can explain some of this.  I don't think there is a direct picture of the kitchen, as it is now, on Dianne's blog. The cabinets all along the wall on the sink side are gone. We moved 3/4 of the kitchen out towards the great room a couple of feet. We did this by taking out another closet that was next to the closet with the hot water heater in it. That means there is a small jog right across from where the fridge is located. I chose Martha Steward White cabinets and where that jog is I put a floor to ceiling pantry. We replaced all the appliances and used Butcher Block counter tops. I used a Farmhouse sink and it is located ,in the kitchen, right below the picture you will see of the opening with the corbels.
 Picture of the ugly, tight, shower in the Master Bath
 See all of those closets on the right hand side and the left hand side. We got rid of one of them on the right so we could install a jacuzzi tub.
We got rid of the ones on the left so we could install a dresser I refinished with double sinks. You will see a picture of this makeover.
 This is a picture looking out of the Master bedroom. You can see into the hall bath and into the foyer... You can also see the useless wall extension. We removed the wall extension.

 Hall Bath
Dianne has several pictures of the makeover of this bath.
 Hall Bath
Removed the light fixture and 
got sconces which I painted and waxed with
Annie Sloan Chalk Paint...
As a matter of fact, this entire condo has
many pieces painted with Annie Sloan Chalk Paint. I
love painting and waxing with it...
no priming or sanding required...
Yep, you read correctly...but I am sure most of you know about it already as it is all over the blog world. I found out about it from Miss Mustard Seed.
 Dianne shows you a picture of the vintage dresser I refinished to house the new sink and hardware. I took the mirror off of the dresser and hung it on the wall for the bathroom mirror.
We covered up the wallpaper with vinyl beadboard and painted it Sherwin Williams Rainwashed, which matches the beadboard used on the ceiling in the Great Room.
All of the walls in the condo that do not have Beadboard or Board and Batten were made smooth.
We covered up the popcorn ceilings with Ceiling Tins.
 We raised the ceilings in the hallway and bath to give the place a more spacious look. It made a huge difference in the feel of the area.
This is looking out of the Greatroom area down the hall.. See that door on the right... that is the closet we took out in order to increase and open up the kitchen.

And, for now, that is it. I loved seeing our condo featured on Dianne's lovely blog. I am so looking forward to being there again and enjoying drinks on the deck.
I am also looking forward to taking some more pictures to share. Looking at makeovers is one of my favorite things to do. Thanks for stopping by and visiting with me. Now, hop on over to Dianne's here!


I am linking up with Feathered Nest Friday

Saturday, July 7, 2012

Old and New


 It is so nice to sleep at night 
with angels watching over you!

Our Master Bedroom 
Headboard Treatment
 In Pinetop 


I just bought this 40's Formica
table to Mosaic for our patio area.
I think I scored for I only paid $20.00 for
it at a local thrift store. :)
I found a few of these dishes at a local
antique mall and they were on the half
price shelf... :)

There is a 12 piece place setting of these adorable
dishes. I paid more than I would have liked but all
of the centers have this beautiful focal.
Another 12 piece place setting set I purchased at a 
different antique store. Again, more than I would have
liked to pay but the owner still gave me a deal.
There are 84 pieces to the set and they all have this
great pattern all over each piece. 

I am not sure what pattern I am going to use on the table. I need to do some , rather lots, of chipping and placing to figure out if I want to combine some different patterns or use all of one set. Whatever I decide, I plan to keep four to six place settings in tact. I think it will be cute to set the table with the same place settings that are used for the mosaic.
Don't you?
What do you think?
All of one pattern or mix it up?
I have some other pieces left from the other table, stepping stone and mailbox so I have lots of options.


I am linking up with


Funky Junk's Sat Nite Special

Thursday, July 5, 2012

Some of the Fourth of July Week

 Saturday Afternoon at the Orchard in Pinetop
With Janice
 Jim, Janice's husband, with Randy, my husband
with us at the Orchard.
 Lavendar Plant
at the
Lavendar Festival

Getting here turned out to be quite an adventure.
The GPS was way off...
Took us out in the boonies and when I say boonies
I mean boonies.
I have heard tale of many meth labs being out in the boonies
around these parts and we were lost.
We had passed what looked like a nice house being built off the road. I told Janice if I could get us back to it we were asking directions. When I found it again, I pulled into the driveway which took us a little ways off the road. I was looking at a sign on my left.. Janice was looking at an old trailer tucked in bushes on the right.
The sign read:

No Trespasers
Trespasers Will Be SHOT
Survivors Will Be SHOT

I backed out of the driveway as quickly as possible.
Luckily, we made it back to the highway and Janice got us directions using her Iphone.
That was the first exciting event of the day. 
Another will be later in this post.
 Janice and I with our lavendar
You can tell, as usual, I have to purchase
a lot!
We were able to pick bundles.
I had no idea there were different varieties of Lavendar.
We purchased bundles of the sweet smelling kind.
We bought buds of the kind with which one cooks.

After the Lavendar festival, on the way home, we stopped at the Wallmart which is 15 miles from our home. I had my grocery list on my Iphone and had it out to look at my list.
We went to the rest room and I accidentally left my phone on the paper dispenser in the stall.
We got some items in the beauty dept. and then I looked for my phone..
Oh No!
Back to the bathroom..
On to Customer Service...
No phone turned in...
Called our husbands...
With my husbands phone he started tracking mine.
It was still in Wallmart.
I asked Customer Service to please make an announcement.

My husband reported to us my phone was no longer in WalMart
It was on the move...
headed in the direction of our house.
Jim and Randy left our house and started following 
my phone.
When they were getting closer to it, Jim synchronized his IPhone to make sure they were at the correct location.
I still can't believe they got my phone back.

They pulled up in front of a house that was on the Indian Reservation. A woman was unloading groceries, along with her son, who was about 14 years old.
My husband rolled down the window and told the lady he would like to have his wife's phone back.
At first she denied everything.
Jim told her we were reporting the phone stolen.
It would be no good to her, bla, bla.
All of a sudden, the young man started walking towards my husband's truck and handed him my phone.
They had taken the cover off but my phone was in tact!
Thank goodness they left my phone on and it had enough juice to last....
We have all had such a good time with thinking about the woman wondering how in the world she was found.

It was quite an exciting day.
We have also had laughs about our husbands becoming detectives.

Now..
The Fourth of July


 Fire in the Fireplace..
Yep...cold and rainy!
Our Fireworks on Jim's Ipad

We played Cribbage and ate a fabulous meal.
Hope your Fourth was as happy as ours, shared with
 great friends!